The open response questions in the Language component of the Primary and Junior assessments may be completed by the students online or on a printed response sheet (printed by the school). The system default response format for all Grade 3 students is paper, and the system default response format for all Grade 6 students is online. Teachers may change the response format for open response questions to meet the needs of their students. It is recommended to use the sample test at eqao.com in advance to help determine which format is most suitable for each student.
Assigning Paper or Online Response Formats
Option 1:
- Log in to your teacher account.
- Go to the Manage Students page.
- Click on a student’s name in the list.
- Use the drop-down to select the response format: paper response or online response.
- Click OK.

Option 2:
- Log in to your teacher account.
- Click on the operational session you have scheduled to access the Invigilation page.
- From the Invigilation page, click the student’s name to switch the response format using the drop-down.


*The above image is referred to as the student modal.
Changing a Response Format during an operational assessment session
The students’ response format should be determined before the assessment begins. However, if an unexpected situation arises, and the student response format needs to be changed during a scheduled assessment, follow the process below.
To change the format from Paper Response to Online Response:
- From the Invigilation page, switch the student’s response format from paper response to online response.
- The student will refresh their screen and navigate back to the open response question.
- The system will now be set to allow the student to answer the open response question online. They may transfer any part of their answer from the printed response sheet to the online answer.
- After refreshing, the student should see a similar prompt on their screen.

To change the format from Online Response to Paper Response :
- From the Invigilation page, switch the student’s response format from online response to paper response.
- Use the Print button within the student modal (not the bulk print button) to print the required assessment response sheets. Each Language session has a corresponding assessment response sheet.
- Distribute the appropriate response sheet to the student.
- The student should refresh their screen and navigate back to the open response question.
- The student will read the question prompt on the screen and write their response on the printed assessment response sheet.
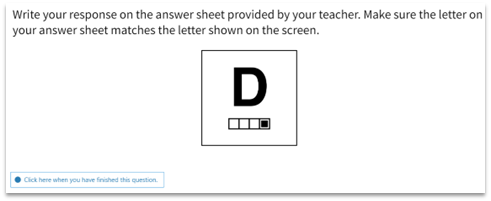
- The student will click “Click here when you have finished this question” (see sample image below), then submit the session, and hand you their printed response sheet.
Printing Assessment Response Sheets
Click the link to download the Tip Sheet for Printing and Scanning.
Printing All Assessment Response Sheets for a Class (Bulk Printing)
You may print assessment response sheets for all students as needed after you have indicated their response format in the system as “paper response“. This will be noted with a pencil icon beside each student’s name.
- From the Invigilation page, click the Print Assessment Response Sheets button located above the invigilation table.
- Once assessment response sheets are generated, save them as a PDF.
- Print them single-sided on 8.5 x 11 white paper. The assessment response sheets are ordered by session. This will allow you to group the sheets together to ensure you are distributing the sheets that correspond to the session that the students are completing.
- Verify that each assessment response sheet has the student name, assessment session label (A,B,C, or D) and a QR code. This information is crucial for accurate uploading.

Sample Assessment Response Sheet

Printing Assessment Response Sheet(s) for Individual Students
- From the Invigilation page, click the student’s name.
- This opens the student modal.
- Select the desired session (A, B, C and/or D).
- Click Print to generate a PDF of the assessment response sheet and print for that individual student.
- Distribute the assessment response sheet that corresponds to the session the student is currently completing.

Scanning Assessment Response Sheets
Click here to download the Tip Sheet for Printing and Scanning.
Once the student has submitted the assessment, the icon in the invigilation table will change.
- If the student wrote their open-response answer online, you will see a green check mark indicating that the session has been submitted. No further action is required.

- If the student wrote their open-response answer on paper, you will see a QR code to indicate that a scanned paper response is required. Follow the steps to scan and upload the paper responses.

- Collect all of the Assessment Response Sheets for the class you are invigilating. Ensure they are secure at all times.
- Use your scanning method of choice, and save the file as a PDF.
- Review the scans, and ensure that the entire page has been captured, that the text is dark enough to be legible and that there are no obstructions over the QR code.
- Store the paper assessment response sheets in a secure location until the Individual Student Reports are available, then shred them.
Uploading Assessment Response Sheets
Click here to download the Tip Sheet for Printing and Scanning.
Uploading All Assessment Response Sheets for a Class (bulk upload)
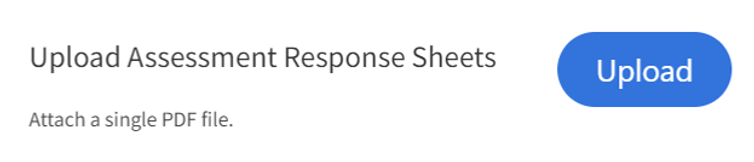
- Click the Upload Assessment Response Sheets button located above the Invigilation table.

2. Click the blue Upload button and choose the Assessment Response Sheet file you wish to upload for this class. The file cannot exceed 25MB.
The system will prepare the selected file for upload.


3. Under the Upload History table, the File Status will indicate if it:
a. Is In Progress
b. Is In Queue
c. Had an Error uploading file
4. While processing, the system will read the QR codes and identify scans for your class and assign them to the matching submitted student session (A, B, C, D).
Once processing has completed, the File Status will indicate if it is:
a. Completed
b. Completed – Review Processing Results Column
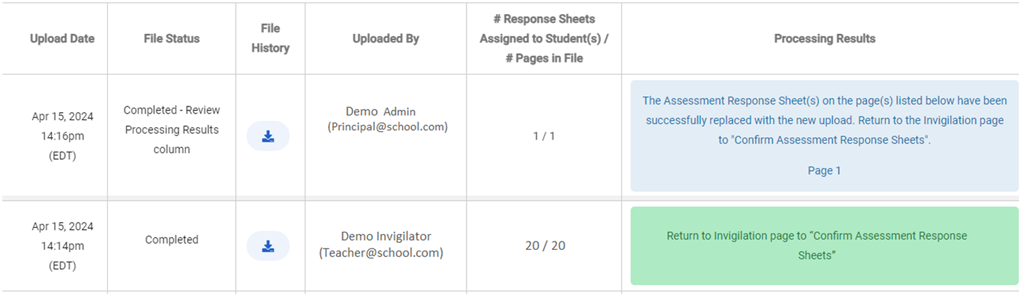
For File Statuses that are Completed, refer to the colour-coded statuses in the guide and follow the instructions in the Processing Results column.
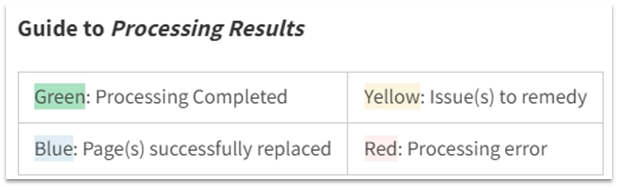
5. One of 4 colour-coded results will be shown
a. For Green results, no issues will be found.
- Click on Return to Invigilation Page button to Confirm Assessment Response Sheets for each student.
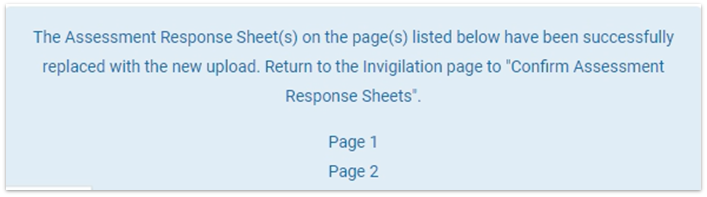
b. For Blue results, it indicates a new upload with successfully replaced page(s).
- Click on Return to the Invigilation Page button to Confirm Assessment Response Sheets for each the affected student.
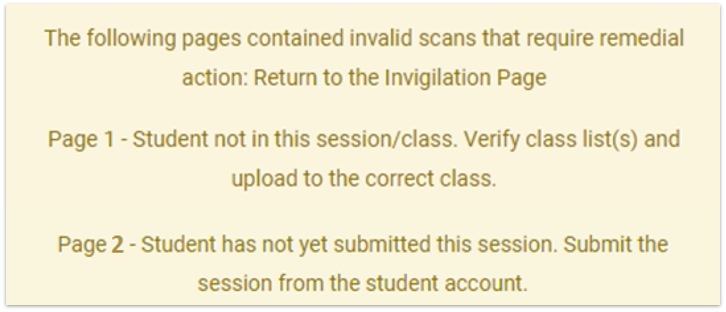
c. For Yellow results, review 2 of the possible issues to remedy.
- Students from a different class will not have QR codes identified. Verify the class list and upload the Assessment Response Sheets to the correct class
- Students who have not yet submitted their session will need to log in and click the green Submit button in the last question of their session.
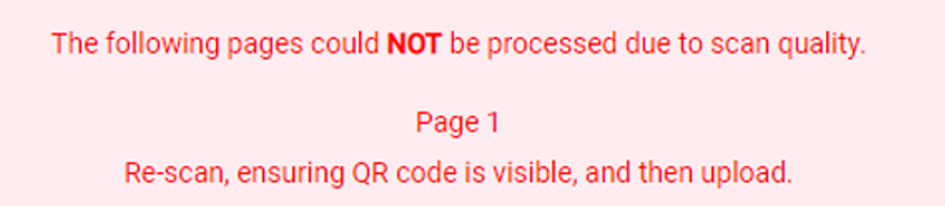
d. For Red results, verify the scan quality to ensure the QR code is visible.
6.Click on the Return to Invigilation Page button.
- address any of the results above before returning to Upload Assessment Response Sheets or proceeding to Confirm Assessment Response Sheets.

7. Review the icons on the Invigilation table to ensure that the scans have all been uploaded.
8. The QR code icon beside each student’s name will change to yellow to indicate the scan has been uploaded (see image below).

Uploading Assessment Response Sheets for Individual Students
- Click a student’s name from the Invigilation table.
- Select the appropriate session (A,B,C or D).
- Click Upload and select the scanned PDF file to upload.
- Click Confirm to verify that the student’s response has been uploaded accurately.
- Click OK to close the upload screen.


Fixing Incorrect Student Uploads
If an assessment response sheet has been uploaded for the wrong student or if it is not legible due to poor quality of the scan, follow the three steps under the heading Uploading Assessment Response Sheets for Individual Students.
This upload will override the previous upload.
Confirming Assessment Response Sheets
All uploaded assessment response sheets must be confirmed.

- Click the Confirm Assessment Response Sheets button located above the invigilation table to start with the first student on the list. Or, if preferred, click a student’s name in the Invigilation table.
- Navigate between students using the arrow keys under the student name, in the right corner.
- Use the Session buttons to move between sessions to view the scanned assessment response sheets for each session (A,B,C and D).
- Click Confirm once you verify that the scan is accurate and legible. A “Confirmed” notification and a green checkmark beside student names will appear in the Invigilation table.
- If the scan is not legible, to replace it follow the steps for Uploading Assessment Response Sheets for Individual Students to override the previous scan.
- If the scan is not legible, but there is no improved scan to replace it, click the box Click here if the original response is not legible and there is no alternative response sheet to upload (if checked this student’s response will be scored as not legible),
- You may verify in the Invigilation table the green checkmark beside each student’s name with a confirmed upload.

The crop button allows you to view the upload as the scorer will see it (with personal information removed).